
Ubuntu/Debian Netplan Configuration for OVH vRack with Multiple IPv6 Subnets
-
Backup Current Configuration
- Before making any changes, back up your current Netplan configuration file.
- Run the following command:
Terminal window sudo cp /etc/netplan/50-cloud-init.yaml /etc/netplan/50-cloud-init.yaml.backup -
Find Your MAC Addresses and Note them somewhere.
- Run the following command to list your network interfaces and their MAC addresses:
Terminal window ip link show- Identify the MAC addresses of your two network interfaces (e.g.,
enp8s0f0andenp8s0f1). - Note them down as you will need them for the Netplan configuration.
- Example output:
2: enp2s0f0np0: <BROADCAST,MULTICAST,UP,LOWER_UP> mtu 1500 qdisc mq state UP mode DEFAULT group default qlen 1000link/ether 00:1a:4b:16:01:59 brd ff:ff:ff:ff:ff:ff3: enp2s0f1np1: <BROADCAST,MULTICAST,UP,LOWER_UP> mtu 1500 qdisc mq state UP mode DEFAULT group default qlen 1000link/ether 00:1a:4b:16:01:5a brd ff:ff:ff:ff:ff:ff- Your main interface MAC:
00:1a:4b:16:01:59 - Your private interface MAC:
00:1a:4b:16:01:5a
-
Edit Netplan Configuration
- Open the Netplan configuration file in a text editor:
Terminal window sudo nano /etc/netplan/50-cloud-init.yamlConfiguration Example for Single IPv6 /56 Subnet
Section titled “Configuration Example for Single IPv6 /56 Subnet”This example assumes you have ordered the following IPv6 /56 subnets:
2001:db8:abcd:1200::/56In netplan, you will configure the first /64 of each /56 subnet for your server. In Kraken, you will use the splitted /56 subnet as /57 /58 /59 /60 for your proxies.e.g.
2001:db8:abcd:1280::/572001:db8:abcd:1240::/582001:db8:abcd:1220::/592001:db8:abcd:1210::/60
Replace the contents with the following configuration, making sure to replace the placeholders with your actual values:
network:version: 2ethernets:enp2s0f0np0:match:macaddress: "00:1a:4b:16:01:59"enp2s0f1np1:match:macaddress: "00:1a:4b:16:01:5a"bonds:bond0:macaddress: "00:1a:4b:16:01:59" # Use the MAC address of your main interfaceinterfaces:- enp2s0f0np0- enp2s0f1np1parameters:mode: 802.3adlacp-rate: fasttransmit-hash-policy: layer3+4mii-monitor-interval: 100addresses:- "192.168.2.64/30"- "2001:db8:abcd:1200::2/64"accept-ra: falseroutes:- on-link: trueto: defaultvia: "192.168.2.63"- on-link: trueto: defaultvia: "2001:db8:abcd:1200::1"nameservers:addresses:- 1.1.1.1- 2606:4700:4700::1111Configuration Example for Multiple IPv6 /56 Subnets
Section titled “Configuration Example for Multiple IPv6 /56 Subnets”This example assumes you have ordered the following 4 IPv6 /56 subnets:
2001:db8:abcd:1200::/56,2001:db8:afc6:2200::/56,2001:db8:f679:f200::/56,2001:db8:d458:e200::/56In netplan, you will configure the first /64 of each /56 subnet for your server. In Kraken, you will use the splitted /56 subnet as /57 /58 /59 /60 for your proxies.e.g. (Same for all other /56 subnets)
2001:db8:abcd:1280::/572001:db8:abcd:1240::/582001:db8:abcd:1220::/592001:db8:abcd:1210::/60
Replace the contents with the following configuration, making sure to replace the placeholders with your actual values:
network:version: 2ethernets:enp2s0f0np0:match:macaddress: "00:1a:4b:16:01:59"enp2s0f1np1:match:macaddress: "00:1a:4b:16:01:5a"bonds:bond0:macaddress: "00:1a:4b:16:01:59" # Use the MAC address of your main interfaceinterfaces:- enp2s0f0np0- enp2s0f1np1parameters:mode: 802.3adlacp-rate: fasttransmit-hash-policy: layer3+4mii-monitor-interval: 100addresses:- "192.168.2.64/30"- "2001:db8:abcd:1200::2/64"- "2001:db8:afc6:2200::2/64"- "2001:db8:f679:f200::2/64"- "2001:db8:d458:e200::2/64"accept-ra: falseroutes:- on-link: trueto: defaultvia: "192.168.2.63"- on-link: trueto: defaultvia: "2001:db8:abcd:1200::1"table: 201- on-link: trueto: defaultvia: "2001:db8:afc6:2200::1"table: 202- on-link: trueto: defaultvia: "2001:db8:f679:f200::1"table: 203- on-link: trueto: defaultvia: "2001:db8:d458:e200::1"table: 204routing-policy:- from: "2001:db8:abcd:1200::2/56"table: 201- from: "2001:db8:afc6:2200::2/56"table: 202- from: "2001:db8:f679:f200::2/56"table: 203- from: "2001:db8:d458:e200::2/56"table: 204nameservers:addresses:- 1.1.1.1- 2606:4700:4700::1111You can add more IPv6 /56 subnets by following the same pattern, or removing the additional subnets if you have less than 4 /56 subnets.
-
Apply Network Configuration
- Save the file and exit the text editor (in nano, press
CTRL + X, thenY, thenENTER). - Apply the new Netplan configuration with the following command:
Terminal window sudo netplan apply - Save the file and exit the text editor (in nano, press
-
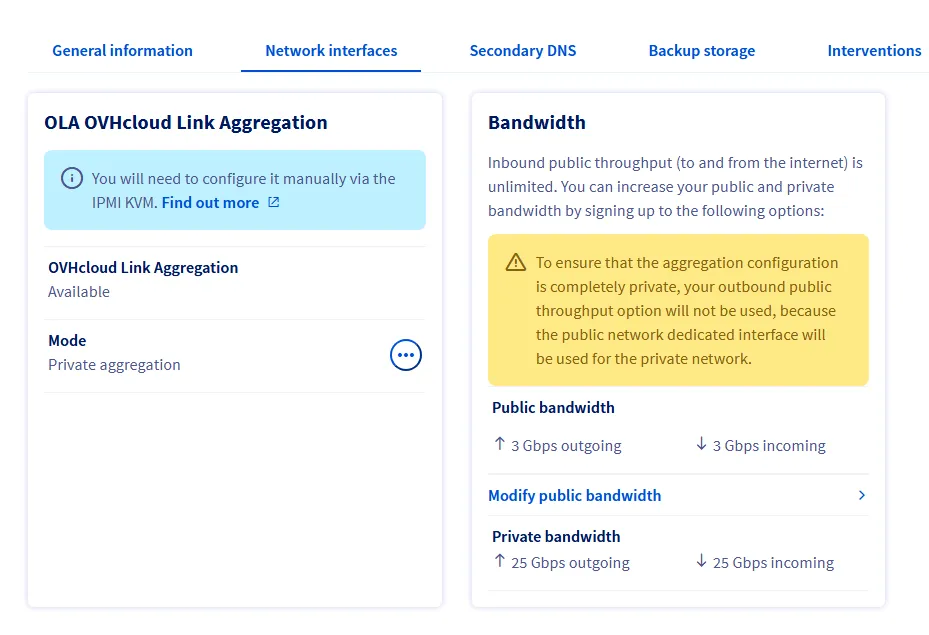
Activate Link Aggregation (LACP) in OVH Control Panel
- Log in to the OVH Control Panel.
- Navigate to the bare Metal Cloud → Dedicated Servers section and select your dedicated server.
- Go to the “Network interfaces” tab.
- Find the option to enable OLA OVHcloud Link Aggregation and activate it. (Mode: Private aggregation)
- Wait for the changes to take effect. This may take a few minutes.
-
Assign Server to vRack
- Navigate to Network → vRack → YOUR_VRACK_NAME
- Add your dedicated server to the vRack
- Verify both your server and IP blocks appear on the right side under “Your vRack”
-
Verify Network Connectivity From your PC: Ping your Server via its new IP.
Terminal window ping 192.168.2.63If Successful connect via ssh to your Server.
Terminal window ssh root@192.168.2.63Test IPv4
Terminal window ping -c 3 8.8.8.8Test IPv6
Terminal window ping -c 3 2001:4860:4860::8888 -
Login to Kraken Webinterface and configure your IPv6 subnets as
/57/58/59or/60subnet. -
Troubleshooting Optional
If your Server does not come back online after applying the Netplan configuration and enabled Link Aggregation, you can navigate to the OVH Control Panel
Bare Metal Cloud → Dedicated Servers → IPMI/KVMsection and use the KVM console to access your server and check the Netplan config again.